Elise Patterns, Make your own bra kit, brasewing, howtomakebras

Exciting bra related news…

As some of you may be aware, I have a little side business called Elise Patterns. I sell lingerie sewing patterns online. The exciting thing is that I am now branching out and starting to sell lingerie sewing supplies (Big apologies to anyone reading this that has seen me announce this elsewhere on social media or the EP blog, I don’t want to bore you!)

Truth be told, I’m pretty darn excited…. I’ve been working on another pattern for ages and it’s all pattern tested, ready to go. Yet, I’ve stalled a bit on it as i’ve been getting somebody to help me with the graphic design of the pattern before I launch it. And the reason I’ve not had time to finish that yet is the inordinate amount of time I’ve spent researching where to get the best lingerie supplies. Literally for the last three months when i’ve not been in my other day job, I have spent a ridiculous amount of time chatting to different suppliers, tracking down things with completely different names to what I would call them and waiting for samples, so that I could get hold of the best supplies available.

Elise Patterns, Make your own bra kit, brasewing, howtomakebras

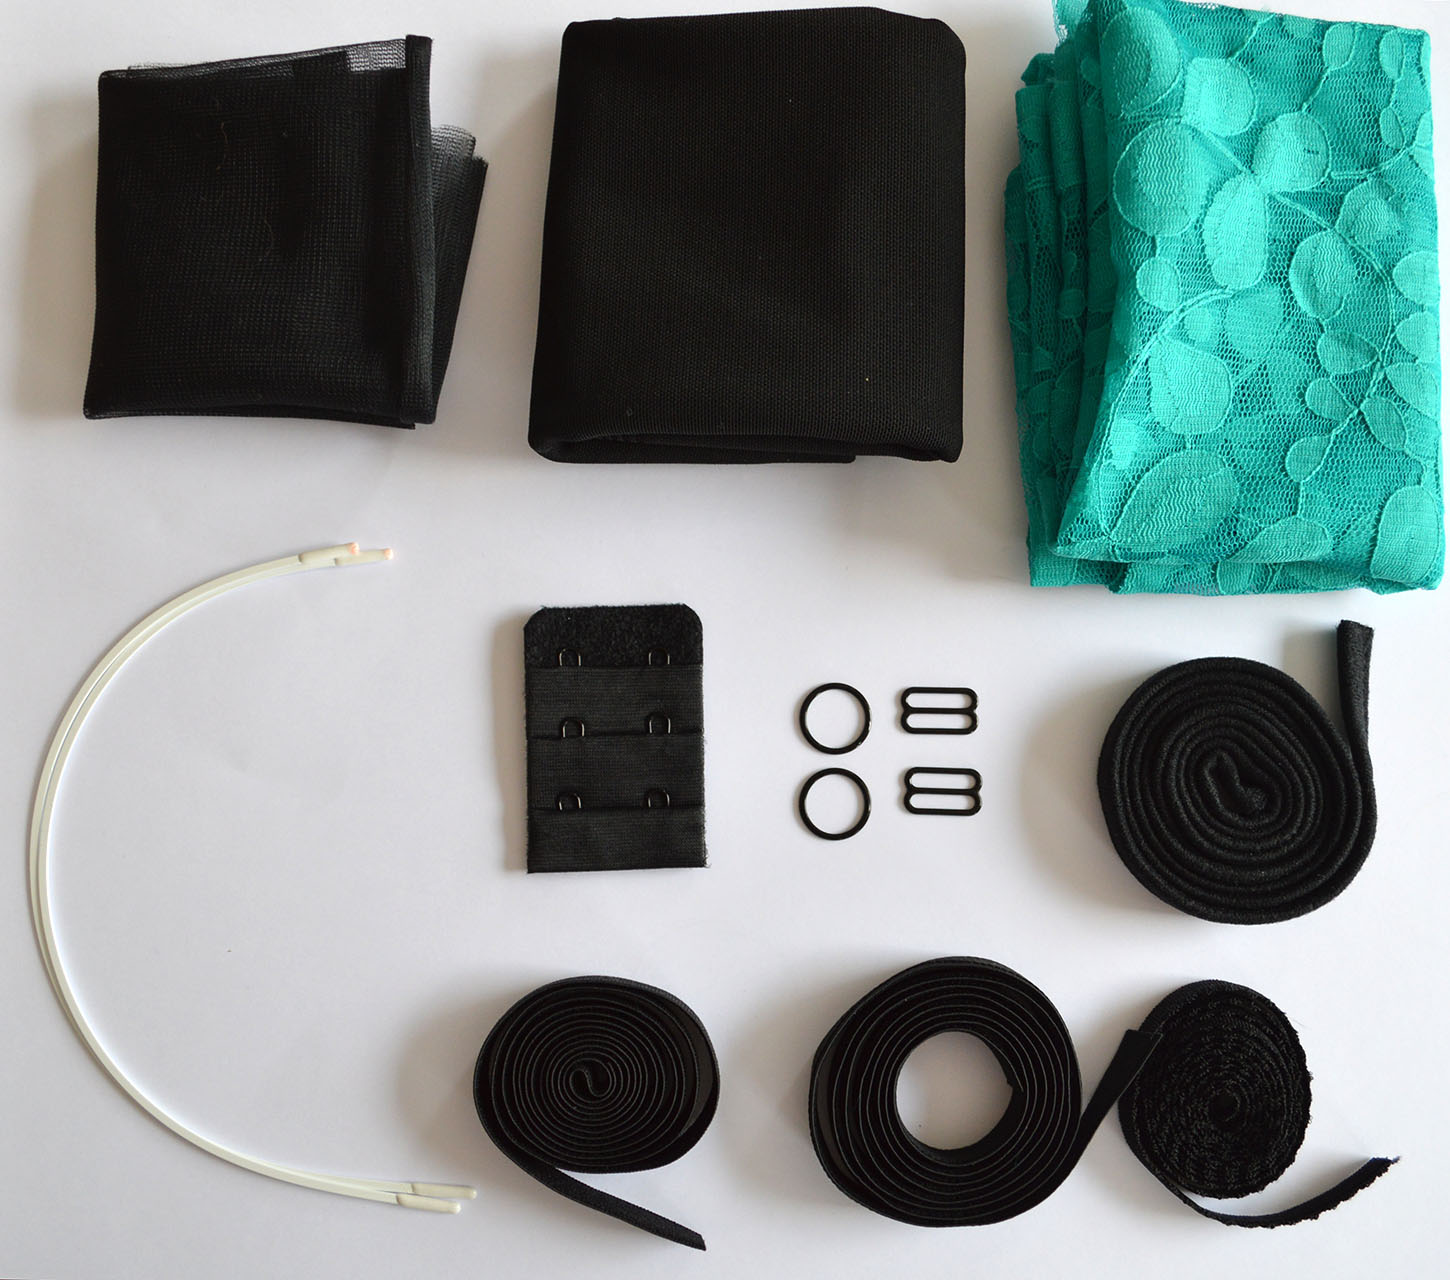
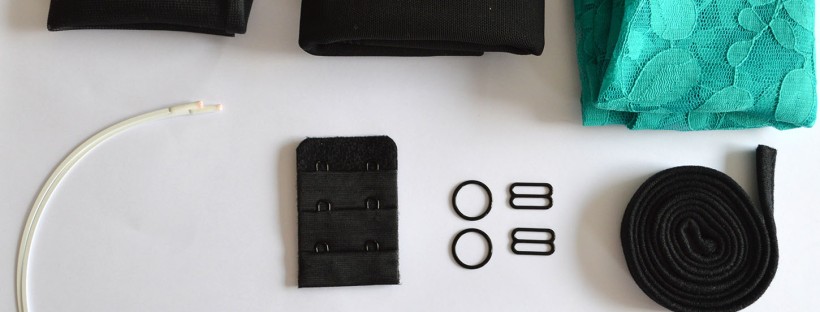
Finally, it’s all come together and I’m really happy to announce i’m launching ‘Make your own bra kits’ – to make your own bra with! If you want to know a bit more about them, I’ve written about them on the Elise Patterns blog. Alternatively you could just go and buy them on my website!

(Random trivia fact: If you have a really, really, really good memory you might find that the lace in the bra kit is very similar to one that was on GBSB recently…. It has a different composition but basically it’s the same design.)

Elise Patterns, Make Your Own bra kit, Blue Lace Bra Kit

And if you’re wondering why I continue to have two blogs… I ask myself this question on a regular basis too! But I guess I have to find somewhere to write about how much I loathe making quilts and general boring home decor stuff like curtains. Because, yep you guessed it, whilst there hasn’t been that much selfish sewing going on, I still had to find the time to be a good friend and make a baby quilt and finish a pair of curtains….

Vintage look black and peach tricot bra, Kwik Sew 3594 Bra sewing pattern, bramaking, bra sewing

Ok, so there may have been some selfish sewing going on…. I tried out the Kwik Sew 3594. The lumpiness is caused by the pair of socks filling out the cups! The armless mannequin doesn’t have such an ample bust…


October in Pictures…

And if you haven’t yet filled out my awesome quick survey on Lingerie sewing patterns and you would like to you can fill it in by clicking on the link below, thank you! Basically I need to get as many responses as I can, so if you know of anyone that likes to sew clothes then pass it on, please!! Thank you!

Click here or on on the pop up.

A little survey…

Things have been a bit slow for me this month as my current working woes continue and I have had to focus on that for a while…. Well actually, it hasn’t been too bad, I’ve had two job offers for something completely different to what I do now and now I have to really decide what I really want to do.

Anyway, to those that know me, I have these little crises every few years or so and I thank my parents wholeheartedly for putting up with me and always loving me no matter what I say or do!

Which brings me onto a little project that I’m undertaking all about Lingerie and I would love to have your input! So i’ve put together a small survey asking people’s opinions about lingerie and sewing patterns and I would dearly love it if you could spend 5 to 10 minutes of your precious time to complete it.

There are only 13 questions, so it’s super quick – depending on how much you want to write.

UPDATE: My Survey has Now Closed – Thank you all! 


The Hello Kitty Bra


This bra is dedicated to my friend Kat and her love of leopard print 🙂 or lack thereof!

DSC_0046

Teaching Kat to make bras the other week, I pulled out this little number I was making and asked her whether she liked leopard print – turns out she hates it (Not the bra, just an aversion to leopard print). Oh well, more for me then. I’m going to embrace my inner perma-tanned 80 year old wearing inner self with as much all-over leopard print clothing, lashings of  kohl eye liner, pale pink lipstick and a margarita in my hand…

But back to bras, I present to you the Danglez DB4E:

DB4

Danglez Bra Patterns

Which looks a lot like a bra that I own from this British bra company – Miss Mandalay. This three piece cup seems to be their standard bra design.

1334920502-17205000

(Photo from here)

And because a whopping 60.87% voted for finished bra pictures to be modelled on a real person in my last post about bra making, I have conjured up a bra model (By the way – I really hope it wasn’t a bunch of perverts that hacked my page and voted!)

Firstly, if you have just eaten your breakfast – I apologise. Secondly, this person is aware of the fact that they have back fat – so no bitchiness please 🙂

Hello Kitty Bra, leopard print bra, bra sewing, Danglez DB4E

Well, what can I say about the construction?

I really don’t like the pattern. No, scratch that, I like the design but I HATE the instructions. And, it is at this point that people would say something vaguely humorous like the instructions were like reading double Dutch. Well readers, I can read and understand Dutch and even if these instructions were in their original Dutch I wouldn’t understand them! (n.b. Danglez is a Dutch Pattern Company). Where are the pictures??!!! The construction sequence is just weird and so ended up just doing my own thing, again. I always like to start with the cups, then the band, then the elastic, then the underwire and finally the straps. I guess I’m a creature of habit but you know ‘if it ain’t broke, don’t fix it!’

DSC_0008

This is also first time I have made a bra from lycra. Let me tell you, I was sceptical to begin with and I am still sceptical after I have finished!! I like a rigid cup and bridge, especially if you are making a bra for bigger cups. I certainly do not like the idea of applying interfacing to strengthen my bridge piece. NONE of my RTW bra’s have ever featured that so why should home made bras differ so much from your RTW bras?

Additionally the pattern calls for lingerie lycra – I have no idea how thin or thick that is but I ordered another bra/lingerie pack online a while back and ended up with a load of leopard print lycra. I assume that the lycra I have is appropriate for lingerie but it’s pretty flimsy so I’m surprised that this pattern (specifically for larger cups) instructs you to only cut a lycra wing piece that you attach elastic to the bottom and top of. There is hands down not enough support for a lady with larger cups in a bit of flimsy lycra at the back. Anything over a C or D needs powernet, seriously. (FYI this bra pattern is designed for cup sizes D to F.)

So here’s what I did:-

I liked the idea of an all over leopard print bra, so I had a layer of powernet and rigid tricot on the inside with a layer of leopard print lycra on the outside.  I also did my usual bridge alteration, modified to fit me.


Hello Kitty Bra, leopard print bra, bra sewing, Danglez DB4E

Unfortunately, it’s hard to really know how a bra fits until it’s fully made up. So whilst I am loving the all over leopard print look, the band is unfortunately a bit too tight and I think the cups are flattening the breasts slightly. This is most probably due to me making the bra more rigid when it has been designed specifically with stretch fabrics in mind.


Hello Kitty Bra, leopard print bra, bra sewing, Danglez DB4E

Hello Kitty Bra, leopard print bra, bra sewing, Danglez DB4E

You can seen more clearly from the back view that the band is a bit too tight here.

And for the obligatory interior bra shots:

Hello Kitty Bra, leopard print bra, bra sewing, Danglez DB4E

I definitely could have been neater but I knew this would be a tester bra so my seams are exposed. As it is a double layer cup, next time I will make more of an effort to enclose those seams to prettify up the interior. I will also change the elastic straps, I prefer something more firmer than just elastic for straps. I thought about adding a hot pink ribbon to the front but actually I like the plain leopard print with black look just as much.

Hello Kitty Bra, leopard print bra, bra sewing, Danglez DB4E

Anyway, I’m completely sold on the leopard print now and am thinking of making matching knickers, a slip and a bra. Seriously a girl can never have enough leopard print, right?


The Everyday Bra – Part 1 – Kwik Sew K2101

As some of you know, I am just a slight bit lingerie obsessed. And, I sort of like to make bras. The difficulty in having a sewing blog is the ‘show and tell factor’. I mean it’s fine to model a dress but what do you do with bras? Hang them up on a hanger? Put them on a dress form and fill them up with padding? Lay them decoratively draped along a table or in my case – wooden floors? Or do you model them?

And what do you do with the racey lacey bra’s – I’m no lingerie model and I have employers who would not look too favourable (at all) on me for modelling them. But how else are you supposed to show people the fit? And not attract the perverts at the same time?! Well, I’m kind of stumped on that one… So, if you could help me decide how to photograph my bras in future by filling out this small poll, I’d really appreciate it.

Today’s Bra is the Kwik Sew 2101. Which looks a lot like this:

Kwik Fit Bra

Yep that’s the one, the blondes with the bad attitudes, power posing in their undies.

Oh yes, and I will probably regret this later this but here’s a trip down memory lane for you circa 2010 – My first attempt at bra making (made with a bra toile kit) and first attempt at K2101. I think this is actually my first attempt at even making anything. I won’t be offended if you think me crazy for trying to make a bra first before I ever made a skirt or a dress…. Yes, I’ve heard the expression ‘you shouldn’t run before you can walk’ – But that will NEVER stop me :-). You see, I told you I was obsessed with underwear! I didn’t even know what a seam allowance really was. Hence the horrendous mess you see underneath – And a permanent blot on my sewing CV…. Oh the shame!!

My first Toile Bra

A good few years later and some other bras in between, I finally decided to return to the Kwik Sew nightmare. And, funnily enough, now that I actually know how to sew and choose the right size – My finished bra doesn’t look anything like the one above and it was pretty easy to put together!! It also fits (But please note, as we are all shaped differently, I consider myself lucky in that regard. We don’t always manage to get a good fit first try).
And here’s how I did it:
I used a convenient little bra kit purchased from what was originally called the Sewing Chest but is now Bra Maker Supply. I bought this one years ago but they still sell similar and there are lots of other places that sell bra kits online now too. I used this supplier just because it’s in the UK. It’s pretty convenient to have all the right things in one package though. Seriously, has anyone tried hunting down rigid sheer nylon down Goldhawk road? It’s a mission finding something remotely similar!
For the underwires, I had none at home that were the right fit, so I used some from an old bra of mine that I was getting rid of.
DSC_0186
Contents of my bra kit
The finished version:
DSC_0220
Alterations: I altered the bridge piece of the bra and then hoped the cups would fit well. For more information on how to alter your bridge – This eBook by Norma Loehr – Demystifying Bra Fitting & Construction has a good section on it.
DSC_0222
I made a 38D, as this is the sister size to my RTW bra size of 36DD. And I also made some other minor alterations with the straps, elastic insertion and underwire casing. Mainly because the instructions and me did not see eye to eye on certain parts of bra construction. I’m lucky that I have experience in making bras and therefore know what to do but I can see how it could be pretty confusing for a beginner. No wonder my first attempt was such a mess!
Saying that, it would be remiss not to let you know I did mess up the 3 step zig zag on this bra. Thankfully you can’t see it but it took me until I was about 2/3 of the way through stitching the elastication to realise why my 3 step zig zag stitch was off. On my Bernina, the stitch picture of a 3 step zig zag is incredibly vague! I didn’t bother to unpick as I would have been doing that for forever!
DSC_0223
Inside view
DSC_0225
Wing View & Elastication
One thing I would change though is that this pattern recommends tricot for the cups but no rigid liner or stiffener. I guess this is personal preference but for me I like a rigid cup much like my RTW bras, so next time I will be lining it with a rigid nylon lining. I can’t remember where else I read about this recently, but I’m sure I’ve read recently on somebody else’s sewing blog  their lament on fabrics available to the home sewer for making up bras and the difference in materials in your RTW bras. I have to agree, the stuff we have available is not as good as the RTW and is often hard to find.

Corsetry Fun :-)

Something else that I made recently which I know I should definitely have photographed but forget to, is a lovely little chemise slip I made for my friend Sophie’s birthday. It’s a lovely thigh length, v necked silk satin slip with black lace trim to the top in a beautiful muted mulberry/grape colour. Sophie had complained that she had a new dress that was short and slightly sheer that she needed a slip for. She hadn’t been able to find a suitable slip for it. And as she’s been such a good friend to me I knew I could easily make one for her. I find it really rewarding making something for somebody that really appreciates your efforts.

This brings me onto my real subject; discussing at work the other day what we were doing for Christmas presents this year. I piped up with the notion that I might make all of mine this year – not exactly a new notion amongst most sewer-bloggers out there but I’ve never really got round to it because of time and motivation. Imagine my horror, when my colleague calls me a ‘cheap skate’ for wanting to make all of my presents… Erm…. ok…. But I would just like to make this point:-

La Perla Maison Lace Trimmed Camisole as featured on Net-A-Porter £335 (Sorry I can’t get this picture much bigger).

195858_in_xs


My camisole making abilities as featured here – for a fraction of the price…

Lingerie Collection

So, ‘cheap skate’ that I am (Can you tell how annoyed I am by this label??!!), I am making my friend Kate a corset for her Christmas present! And making corsets aren’t exactly cheap – And I’m only talking materials here and not even including labour! Bespoke corsets can cost in the region of £700 plus… (I’m not claiming that I have that ability, but I’m just stating that that is how much it can cost.) Also, whilst I would like to say how philanthropic I am for making this corset for my friend, I would be remiss if I didn;t say there wasn’t something in it for me – building up a portfolio of work for myself and developing my skills in pattern cutting and corsetry construction. So here begins the journey of Kate’s corset:-

Pattern Cutting a la Handmade by Freya – Pint of water, Catch up TV on Ipad and my trusty Frixion pen and patternmasters….

DSC04622

Toile number 1: I really like the shape that the corset is giving Kate here. We decided on a sweetheart neckline for Kate. This corset is going to be more of a boudoir corset rather than one to be worn outside over clothes. The corset needed a little bit of taking in at the side seams to lose a little bit of the bagginess there and a little from the bottom front hip side seam. We’ve so far managed to avoid the dreaded over corset bra band bulge – I hope you know what I mean by this!!

DSC04633
I’ve already taken off 3 to 4″ from her initial measurements for this toile but I can see that she is going to need more, the corset is nearly closed and in fact it wouldn’t have been difficult for me to close the gap when I pulled it closer. Again, a little bagginess at the top needs to be addressed, you can see this on the top right hand corner. Not bad for a first toile though, now back to the drawing board 🙂

DSC04634